
TL;DR
A closet can become a surprisingly good recording booth if you focus on blocking sound leaks, managing reflections, and placing your gear wisely. The real game changer? Moving noise away from your workspace entirely and ensuring good airflow in enclosed spaces.
Ever wonder why some closet studios sound crisp while others echo like a cave? The secret isn’t just slapping up foam panels—it’s about how you treat every surface, block sound leaks, and place your gear.
This guide uncovers the real tricks to transforming a tiny closet into a high-quality recording space. From acoustic dampening to smart placement, you’ll learn how to get pro sound without blowing your budget or tearing down walls.
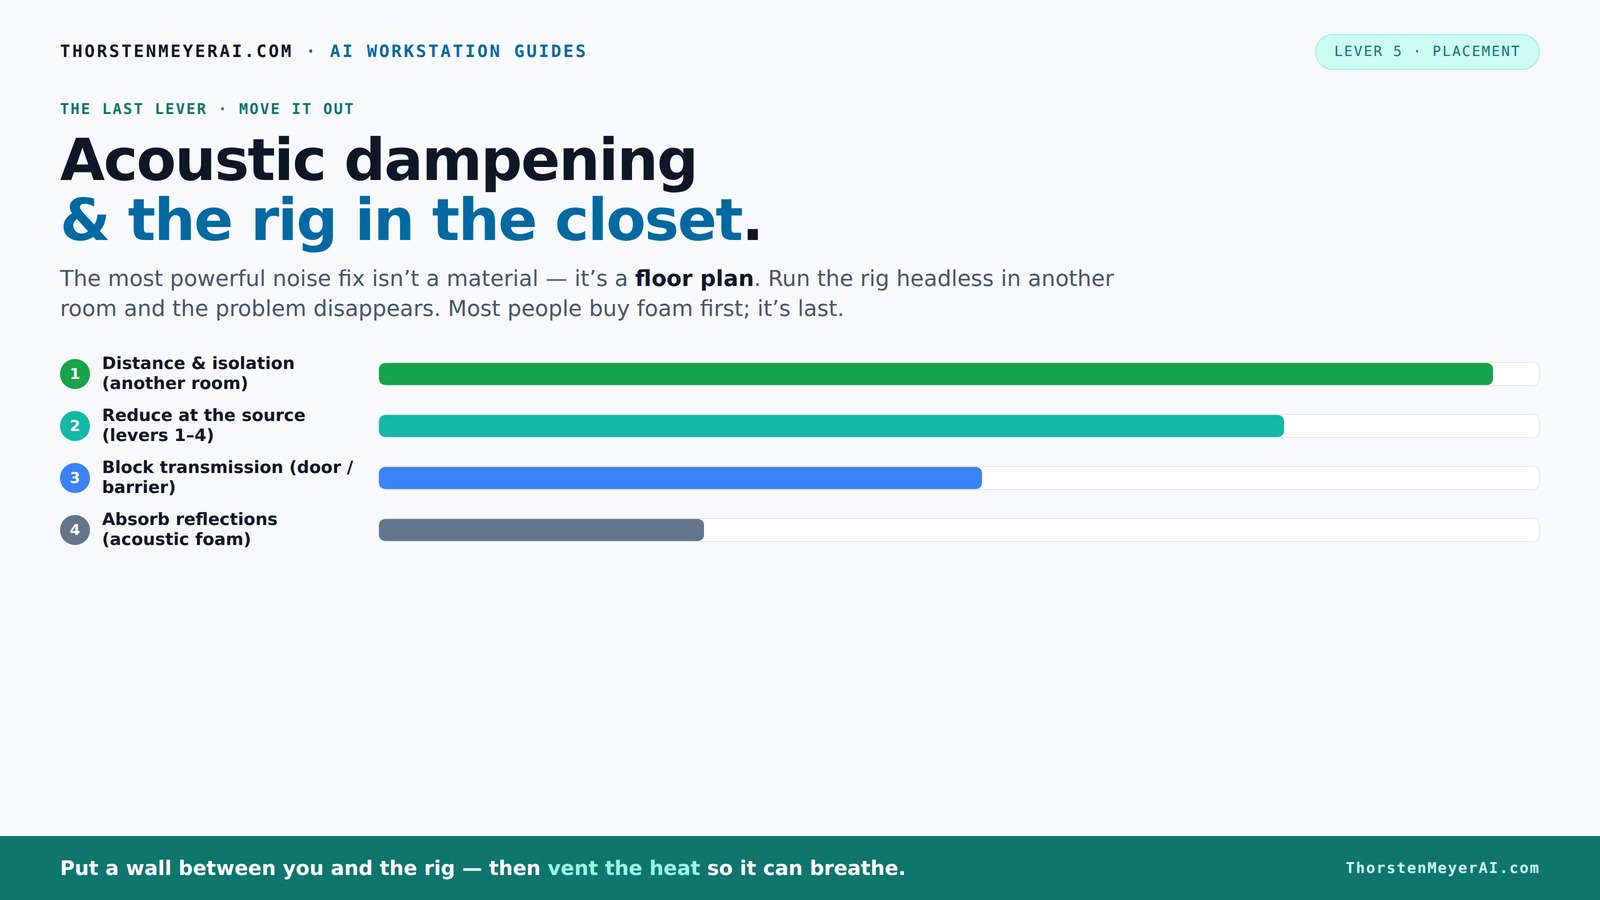
Acoustic dampening
& the rig in the closet.
The most powerful noise fix isn’t a material — it’s a floor plan. A rig you can’t hear because it’s in another room beats any amount of foam. Tap the approaches in Part 1 to see what actually works.
(another room)
(levers 1–4)
(door / barrier)
(acoustic foam)
Contain the noise, not the heat
Key Takeaways
- Moving your rig out of the room dramatically reduces noise and heat issues, making treatment less critical.
- Thick absorption panels (2-4 inches) outperform thin foam in controlling low frequencies and reducing boomy sounds.
- Sealing gaps in the door and around cracks is one of the most cost-effective ways to cut sound leaks.
- Proper ventilation is essential when placing a high-power rig in a closet; active airflow prevents overheating and noise buildup.
- Mic placement close to the reflection point and using the right absorption materials can instantly improve recording clarity.

50 Pack Sound Proof Foam Panels for Walls, 2 X 12 X 12 Inches Acoustic Foam Panels, High Density Acoustic Panels Sound Absorbing, Noise Cancelling Studio Wedges, Black (NOT INCLUDE ADHESIVE)
PROFESSIONAL SOUND ABSORBING PROPERTIES – Our acoustic foam panels are expertly designed to reduce noise pollution by absorbing...
As an affiliate, we earn on qualifying purchases.
As an affiliate, we earn on qualifying purchases.
Why Your Closet Can Be a Recording Hero (If You Do It Right)
Most people see a closet as just a tiny, awkward space. But with a few clever tweaks, it can become a surprisingly good spot to record vocals or instrumentals. The key? Managing reflections and sound leaks.
Imagine singing in a closet—your voice is immediately lively and crisp, but too much echo ruins clarity. That’s where smart dampening and placement come in. You want to tame the reflections while keeping the room's natural energy alive.
According to soundproofing experts, small rooms with parallel walls create standing waves and low-end buildup. Adding absorption and strategic placement can turn that chaos into clarity.

118” Wedge-Shape Foam Window Weather Stripping Door Seal Strip,Soundproofing Frame Winter Insulation Tape for Exterior Front Door,Noise Cancelling Window Inserts,Door Gap Filler Light Blocker,White
Upgraded Wedge Design: This window draft stopper features an upgraded wedge design, tapering from 5/32" to 11/32" (0.16"–0.35")...
As an affiliate, we earn on qualifying purchases.
As an affiliate, we earn on qualifying purchases.
Acoustic Dampening vs. Soundproofing: Know the Difference
Acoustic dampening and soundproofing are often confused, but they serve different purposes. Dampening absorbs sound reflections and reduces echo inside the space. Soundproofing blocks sound from leaving or entering.
In a closet, dampening materials like foam, blankets, and rugs soften reflections. Soundproofing involves sealing gaps, adding door seals, and installing barriers to prevent leaks. Think of dampening as controlling what’s inside; soundproofing as controlling what escapes.
For example, hanging a thick blanket over the door reduces sound leakage, while foam panels on the walls absorb internal reflections—both work together for better sound quality.

2 Pack Studio Monitor Isolation Pads for Large Speakers Sound Insulation Studio Foam Prevents Vibrations Acoustic Speaker Isolation Pad High Density Fits Most Stands
Enhanced Sound Clarity: Saiqiang speaker isolation pads can reduce vibrations and resonance, providing cleaner, more accurate sound from...
As an affiliate, we earn on qualifying purchases.
As an affiliate, we earn on qualifying purchases.
Where to Place Your Microphone for Clear, Professional Sound
Microphone placement is king in a closet studio. The goal? Minimize reflections and capture your voice directly. Position the mic about 6-8 inches away from your mouth, slightly off-axis to avoid plosives.
Use the 'reflection point' rule: stand where your voice hits the wall behind the mic, then treat that area with foam or a reflection filter. Moving the mic closer reduces room sound, but too close can cause proximity effect—so find that sweet spot.
For example, a popular setup is to sit in the corner of the closet, angling the mic toward your mouth while placing foam panels behind and around it. This setup minimizes echoes and captures a warm, focused sound.
'Snap Studio' XL Portable Recording Booth | '#1 Vocal Booth' Rolling Stone | Record Crisp Dry Echo-Free Vocals at Home or On-The-Road | The Original & Best Studio Booth, Trusted By Singers & Voiceover
#1 Recommended Portable Recording Booth — Featured by Rolling Stone Magazine as the “best sound booth”, Snap Studio’s...
As an affiliate, we earn on qualifying purchases.
As an affiliate, we earn on qualifying purchases.
Treating Walls, Ceiling, Floor, and Door: A Step-by-Step Strategy
- Walls: Cover parallel walls with 2-inch thick foam panels or DIY alternatives like blankets and panels. Place bass traps in corners to tame low frequencies. This helps prevent standing waves and reduces muddiness, but over-treating can deaden the room's liveliness. Striking a balance ensures clarity without making the space sound unnaturally dry.
- Ceiling: Hang foam or acoustic tiles overhead to reduce reflections from above. Even a thick curtain can help. This prevents high-frequency flutter echoes that can muddle recordings.
- Floor: Lay down a rug or carpet to absorb footfalls and bouncing sound waves. A soft surface reduces sound bouncing back into the mic, maintaining clarity and warmth.
- Door: Seal gaps with weatherstripping or hang a thick blanket over it. For better results, use a DIY door seal with foam or a heavy curtain. Proper sealing minimizes sound leaks, which is crucial because even small gaps can let in unwanted noise and compromise your recordings.
For example, layering a blanket over the door, combined with foam on the walls and a rug on the floor, creates a much warmer, less reflective environment. Keep in mind that sealing gaps not only prevents noise from escaping but also helps contain your sound inside, improving overall acoustics.
According to soundproofcow.com, sealing cracks and gaps is often the most overlooked step—yet it makes a huge difference in controlling leaks. The tradeoff is that perfect sealing can be tricky—so prioritize sealing large gaps first, then refine with additional materials.
Budget-Friendly Materials That Actually Work
You don’t need to spend a fortune to improve your closet's acoustics. DIY solutions like moving blankets, thick curtains, and even egg crate foam can make a big difference.
For instance, hanging a few blankets around the mic area and placing a rug on the floor can cut reflections by 50% or more. If you want more serious control, consider 2-inch thick foam panels—these are affordable and effective in small rooms. The key is understanding that layering different materials enhances absorption and diffuses sound waves more effectively, balancing cost and performance.
Check out [this guide](https://thorstenmeyerai.com/reduce-heat-noise-ai-workstation/) for more ideas on DIY acoustic treatment that won’t break the bank.
The 'Rig in the Closet' Setup — Ventilation and Heat Management
Placing your rig in a closet is fantastic for noise reduction, but it comes with a big caveat: heat. Trapped heat can cook your hardware, especially with high-power GPUs and CPUs running 24/7.
To keep things cool, install active ventilation—like a quiet exhaust fan or an intake vent. This keeps hot air moving out and fresh air coming in. For example, a simple USB-powered fan can make a huge difference in maintaining safe temperatures. Adequate airflow not only prevents overheating but also reduces noise from hardware cooling fans, which can otherwise introduce unwanted background noise into recordings.
Serious setups use purpose-built soundproof cabinets with ducted airflow and thermostats, which can handle multiple kilowatts of heat while keeping noise levels low. These systems often trade some complexity and cost for reliable temperature regulation and quiet operation—crucial for extended sessions. Learn more about these at this link.
Soundproofing Tricks for the Closet Door and Cracks
The door is often the biggest leak point. Hang a heavy curtain or a thick blanket over it to block sound transmission. For a more permanent fix, seal gaps with weatherstripping or door seals. This prevents sound from escaping and reduces noise bleed, which is especially important if you’re recording vocals or sensitive audio.
Use overlapping foam or DIY gaskets to create a tighter seal when the door closes. This simple step can reduce sound leaks significantly, but it’s important to remember that no DIY method is perfect. Small gaps may still allow some sound to escape, but the improvement can be substantial enough for most home studio needs. The tradeoff is convenience versus absolute isolation—often, a well-sealed door with a heavy curtain provides an excellent balance.
For example, a simple curtain over the door, combined with foam strips, can make your closet soundproof enough for most vocal recordings. Consider that sealing is a continuous process—you might need to add or adjust materials over time for optimal results.
How to Prevent Low-End Boomy Sound in Small Closets
Small rooms naturally boost bass frequencies, making sounds boomy and muddy. To tame this, add bass traps in corners and consider broad-spectrum absorption on walls instead of focusing only on corners. This helps prevent low-frequency buildup, which can muddy your recordings and reduce clarity.
Using thick (2-4 inch) panels helps absorb lower frequencies better than thin foam. In tiny closets, covering the entire room with a combination of panels and blankets often yields the best results. However, over-absorbing can make the room sound unnatural or overly dead, so balancing absorption with the room’s natural acoustics is key. Strategic placement of bass traps and broad-spectrum panels ensures you retain some liveliness while controlling muddiness.
Recent trends favor treating the whole space with a mix of DIY and commercial solutions to create a balanced, natural sound. The tradeoff is between cost, space, and achieving a professional sound—often, a combination of targeted bass trapping and general absorption delivers the best results.
DIY vs. Premium Treatments: Which Is Better?
DIY solutions like blankets, rugs, and cardboard panels are budget-friendly but less precise. Commercial foam panels, bass traps, and soundproof doors cost more but offer better control. The choice depends on your goals, budget, and the level of acoustic quality you desire.
In a small closet, a mix of both often works best. Use DIY materials to cover broad areas and add targeted bass traps for low-end control. For example, layering blankets on walls and corner bass traps creates a balanced sound with minimal expense. The tradeoff is that DIY solutions may require more effort and might not offer the same consistency as professional products, but they can significantly improve your sound if used thoughtfully.
Check out [this article](https://thorstenmeyerai.com/reduce-heat-noise-ai-workstation/) for more on affordable, effective DIY acoustic setups, and consider professional treatments if your budget allows for a higher-end, more reliable solution.
Frequently Asked Questions
What is the difference between acoustic dampening, acoustic treatment, and soundproofing?
Acoustic dampening reduces reflections and echo inside a room by absorbing sound waves, making recordings clearer. Acoustic treatment involves installing panels, bass traps, and diffusers to optimize sound quality. Soundproofing blocks sound from escaping or entering a space, sealing gaps and adding barriers, which is more about isolation than clarity.Can a closet really work as a vocal booth?
Absolutely. With proper treatment—like foam panels, blankets, and sealing the door—you can turn a closet into a functional vocal booth. The key is controlling reflections and sound leaks, not trying to make it perfectly soundproof.Where should I place the microphone in a closet studio?
Position the mic about 6-8 inches from your mouth, slightly off-axis to avoid plosives. Aim it toward a reflection point—like the wall behind you—and treat that area with foam or a reflection filter to reduce echo and improve clarity.Do I need bass traps in a small closet?
In tiny rooms, bass traps help control low-end buildup and standing waves. Placing 2-inch thick bass traps in corners can make a noticeable difference, but broad-spectrum absorption on walls often yields better overall sound. The tradeoff is cost and space—more bass trapping can reduce muddiness but might also absorb some of the natural liveliness you want.How do I stop sound from leaking through the door and cracks?
Seal gaps with weatherstripping or foam gaskets. Hang a heavy curtain or thick blanket over the door, and consider overlapping foam or DIY gaskets for a tighter seal. These simple steps cut sound leaks significantly, but keep in mind that absolute soundproofing is challenging in small spaces; the goal is to minimize, not eliminate, leaks.Conclusion
Your closet can become a surprisingly good recording space—if you treat it with intention. Focus on blocking sound leaks, managing reflections, and keeping your hardware cool. The real magic happens when you combine smart placement with layered treatment.
Remember, the goal isn’t perfection—it's making your voice shine without the room's echo or noise. So, next time you're about to buy foam, pause. Think about moving the rig, sealing gaps, and optimizing your mic placement first. Your future self will thank you for a cleaner, clearer sound—and a cooler, quieter setup.